
The Call Manager is a module accessible by all users of CLOUDLI telephony services. The main purpose of this module is to enable users to manage their call forwarding to one or more destinations according to a specific situation (e.g. at work, on vacation, do not disturb, etc.) or according to a customizable schedule. This service is free of charge and can be modified by the user without the need to involve the manager in charge of the company or organization’s account.
How to access it
There are two ways to reach the Call Manager control panel. First, you must log in to the CLOUDLI Customer Portal.
- By clicking on your name, at the top right of the screen, a window will open with general information about you. There are 3 grey tabs at the top right: the Call Manager is in second position.
2. The second way is to choose the “Quick Menu”, which is the icon with blue outlines at the right of your name and then, in the presented menu , click directly on Call Manager.
The two different types of call forwarding
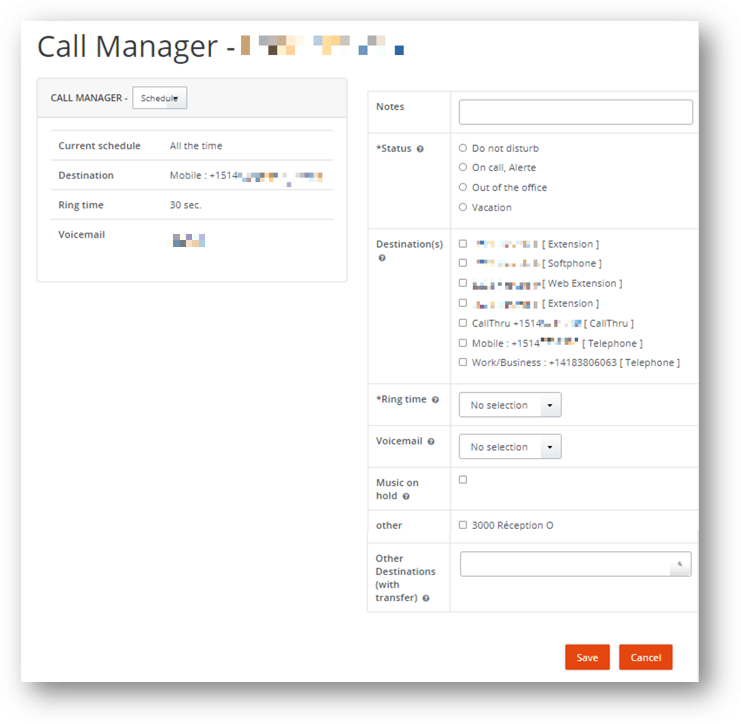
The Call Manager allows you to choose between two possible forwarding modes; either unilaterally according to the status representing your situation (“Call Forwarding on Status” mode) or according to a schedule (“Call Forwarding on Schedule” mode) that you can customize yourself.
1. “Call Forwarding on Status” Mode
This mode offers five different statuses that can be selected in the “Call Forwarding on Status” – NEW section on the right side of the Call Manager control screen. The different statuses available to you are as follows:
- At work
- Vacation
- On call, Alert
- Out of the office
- Do not disturb
You can program the five statuses in this section and choose them according to the situation you are in. Moreover, you should know that *72 function allows you to change your status directly from your device, without going through the Customer Portal.
2. “Call Forwarding on Schedule” Mode
The Call Manager also allows you to schedule call forwarding according to your schedule and have different schedules customized for different time periods.
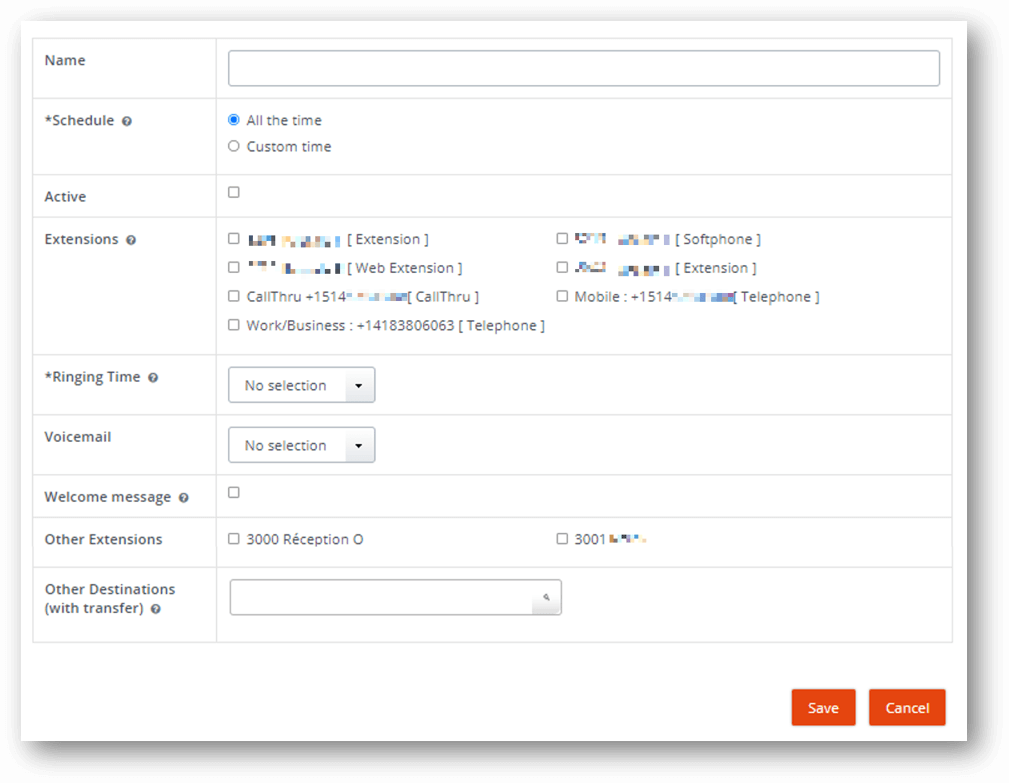
In either case, whether you want to program a forwarding “on status” or “on schedule“, you will have to click on the word “NEW” in orange next to the mode of your choice and the Call Manager control panel will present you with the following menu items.
- DESCRIPTION: this section allows you to give a name to your program or to add personal notes in order to identify the program of this transfer more easily.
- STATUS (for programming “Call Forwarding on Status”): allows you to choose from one of the five statuses offered in this mode. These are: “At work”, “Vacation”, “On call/Alert”, “Out of the office”, “Do not disturb”. Each of these statuses can be programmed according to your specific needs.
- SCHEDULE (for scheduling “Call Forwarding on Schedule”): This section allows you to choose the schedule that will apply to the forwarding you create. You can choose between “Anytime (24/7)” or you can customize the schedule according to the days and hours that suit you. Simply press the green plus logo (+) to add lines to your customization or press the trash can to delete a line. Note that if two referrals are active with simultaneous schedules (at the same time), the destinations will be combined. (image: Schedule_EXEMPLE_1)
- DESTINATIONS: Here you select the destination(s) you want for your incoming calls. Note that if you select more than one destination both devices/applications will ring simultaneously.
- RINGING TIME: The drop-down menu allows you to choose the ring duration you want (between 0 and 90 seconds). Note that if your cell phone is turned off, the call will go to the cell phone’s voicemail and not to your internal office extension.
- VOICEMAIL: the drop-down menu of this box allows you to choose the mailbox to which the incoming call will be directed if there is no answer at the end of the ringing time chosen above.
- WELCOME MESSAGE: click on the box if you want a greeting to be spoken before the ring tones. This message will vocally indicate to the caller that their call is being transferred and the music on hold for the account will be played.
- OTHER EXTENSION (WITHOUT TRANSFER): This section is where you identify the destination you want the incoming call to be routed to if there is no answer at the end of the ring time selected above. It is important to note that calls routed to these extensions will not be handled by the call forwarding that is programmed on the selected extension(s).
- OTHER DESTINATIONS (WITH TRANSFER): Similar to the one above, this section allows you to identify where you want the incoming call to be forwarded to if there is no answer at the end of the selected ring time. However, here the call forwarding that is programmed on the selected extension(s) will be active. It is also important to note that if the call is forwarded by the manager and still forwarded by the manager’s target, the call will be cancelled.
Once this programming is completed, all you have to do is press “Save” and the forwarding will appear.
3. NOTES FOR RECEPTIONIST
This last section of the Call Manager tool allows a user to send a note to the receptionist indicating his absence, availability or any other information regarding his presence at work. This note will appear in the Receptionist Console via a gray bubble above the user’s name for the entire period indicated in the note programming.
